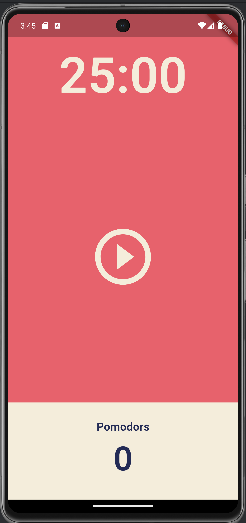
<만들고자 하는 Pomodoro App에 대해서 간단히 UI를 구성해보자 !>
>> 다음의 코드들에 주석을 달아두었으니 확인을 하자
1. main.dart
//main

import 'package:flutter/material.dart';

import 'home_screen.dart';

void main() {
  runApp(App());
}
class App extends StatelessWidget {
  @override
  Widget build(BuildContext context) {
    return MaterialApp(
      theme: ThemeData(
        backgroundColor: Color(0xFFE7626C),
        textTheme: TextTheme(
          headline1: TextStyle(
            color: Color(0xFF232B55),
          ),
        ),
        cardColor: Color(0xFFF4EDDB),
      ),
      home: HomeScreen()
    );
  }
}
2. home_screen.dart
//home_screen.dart

import 'package:flutter/material.dart';

class HomeScreen extends StatefulWidget {
  const HomeScreen({super.key});

  @override
  State<HomeScreen> createState() => _HomeScreenState();
}

class _HomeScreenState extends State<HomeScreen> {
  @override
  Widget build(BuildContext context) {
    return Scaffold(
      backgroundColor: Theme.of(context).
      backgroundColor, //현재 context의 theme를 요청해서 backgroundColor를 가져옴
      body:  Column(
        children: [
          Flexible( //하드코딩 되는 값을 만들게 해줌(UI비율에 기반해서 더 유연하게 만들어줌)
            flex: 1, //상대적인 비율(하나의 박스가 얼마나 공간을 차지할지 비율을 정할 수 있음)
            child: Container(
              alignment: Alignment.bottomCenter, //글씨가 위로 가 있어서 bottomCenter로 정렬(이 외에도 속성 많음)
              child: Text('25:00',
              style: TextStyle(color: Theme.of(context).cardColor,
                fontSize: 89,
                fontWeight: FontWeight.w600,
              ),
              ),
            ),
          ),
          Flexible(
           flex : 3,
            child: Center(
            child: IconButton(
              iconSize: 120,
              color: Theme.of(context).cardColor,
              onPressed: () {}, //버튼이 눌렸을때에 대한 함수인데 우선은 비워두기
              icon: Icon(Icons.play_circle_outline),
            ),

            ),
          ),
          Flexible(
            flex: 1,
            child: Row(
              children: [
                Expanded(  //말 그대로 확장하는 것 -> 맨 아래칸의 흰 컨테이너를 옆으로 길게 확장시킴
                  child: Container(
                  decoration: BoxDecoration(color: Theme.of(context).cardColor),
                  child: Column(
                    mainAxisAlignment: MainAxisAlignment.center,
                    children: [
                      Text('Pomodors',
                      style: TextStyle(
                        fontSize: 20,
                        fontWeight: FontWeight.w600,
                        color: Theme.of
                          (context).textTheme.
                          headline1!.color,  //headline1이 분명히 있는거 아니까 '!'를 붙여줌
                      ),
                      ),
                      Text('0',
                          style: TextStyle(
                          fontSize: 60,
                          fontWeight: FontWeight.w600,
                          color: Theme.of
                          (context).textTheme.
                      headline1!.color,
                          ),
                      ),
                    ],
                  ),
                ),
                ),
              ],
            ),
          ),
        ],
      ),
    );
  }
}
*실행화면
>> 아직 버튼을 눌렀을때 무언가 실행되지는 않지만 UI를 다음과 같이 완성했다.
'플러터 > Pomodoro App 만들기' 카테고리의 다른 글
| [Pomodoro App] #04. Date Format (2) | 2024.03.12 |
|---|---|
| [Pomodoro App] #03. Pause, Play (0) | 2024.03.12 |
| [Pomodoro App] #02. Timer (2) | 2024.03.12 |


